2017年2月23日木曜日

SQL ループ文でインクリメント


ループして複数行を挿入する SQL 文を書いてみました。

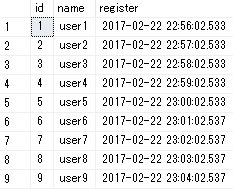
テーブルはこんな構成です。


register 列は DateTime 型のデータです。ループの中では変数の @index を利用して
分(MINUTE)の部分をインクリメントして追加しています。

DECLARE @index int;
SET @index = 1;
WHILE @index < 10
BEGIN
DECLARE @toDate DATETIME = DATEADD(DAY, -1, GETDATE())
INSERT [Test1].[dbo].[TestTable] (id, name, register)
VALUES(
@index,
'user' + LTRIM(STR(@index)),
(SELECT DATEADD(MINUTE, @index, @toDate))
);
SET @index = @index + 1
END

実行すると行が複数挿入されており、分の部分が1ずつ増加しています。


2017年2月12日日曜日

ASP.NET MVC ビューにクラスインスタンスを渡す際のエラー(InvalidOperationException)

2つのモデルを結合したモデルを表示しようとしたところ、こんなエラーが出ました。

--------エラーここから--------

'/' アプリケーションでサーバー エラーが発生しました。

ディクショナリに型 'System.Collections.Generic.List`1[WordLearner.Models.WordDetail]' のモデル項目が渡されましたが、このディクショナリには型 'WordLearner.Models.WordDetail' のモデル項目が必要です。

説明: 現在の Web 要求を実行中に、ハンドルされていない例外が発生しました。エラーに関する詳細および例外の発生場所については、スタック トレースを参照してください。

例外の詳細: System.InvalidOperationException: ディクショナリに型 'System.Collections.Generic.List`1[WordLearner.Models.WordDetail]' のモデル項目が渡されましたが、このディクショナリには型 'WordLearner.Models.WordDetail' のモデル項目が必要です。

--------エラーここまで--------

調べてみると同じエラーで困っている人がいました。
Unable to cast object of type 'System.Data.Entity.Infrastructure.DbQuery`1[]' using linq lambda expression
http://stackoverflow.com/a/22918838

そして回答も掲載されていました。今回検索結果のオブジェクトをビューに返すところを、クエリの状態でビューに渡しているのが原因でした💨
変数 query に FirstOrDefault() メソッドでオブジェクトを取得することで解決しました。

public ActionResult Test(int? id)
{
  if (id == null)
  {
      return new HttpStatusCodeResult(HttpStatusCode.BadRequest);
  }
  Word word = db.Word.Find(id);
  if (word == null)
  {
      return HttpNotFound();
  }

  int _id = id.Value;
  var meaning = db.Meanings;
  var query = from x in db.Word
            join y in meaning on x.ID equals y.WordID
            where x.ID.Equals(_id)
            select new WordDetail
            {
                ID = x.ID,
                Spelling = x.Spelling,
                Meaning = y.Meaning
            };

  return View("Details", query.FirstOrDefault());
}

2017年2月11日土曜日

C# Linq によるオブジェクトの結合

C# Linq を使って、2つのオブジェクトを結合した結果を取得します。

データベースのテーブルはこうなっています。


private WordLearnerDataContext db = new WordLearnerDataContext();

public ActionResult Index()
{
    var words = db.Words;
    var meanings = db.Meanings;

    var query = from x in words
                join y in meanings on x.ID equals y.WordID
                select new { ID = x.ID, Word = x.Word, Meaning = y.Meaning };

    foreach (var item in query)
    {
        Debug.WriteLine("{0}: {1} = {2}", item.ID, item.Word, item.Meaning);
    }

    return View(query.AsQueryable());
}


実行結果

901: deposit = (お金を)預ける
902: evolve         = 進化する

2017年2月5日日曜日

SQL CASE 式の使い方

CASE 式を使って条件に応じた値を出力してみます。

select 
社員コード, 氏名, 在籍支社,/* テーブルに既存の列 */
case 在籍支社
 when '東京本社' then '関東'
 when '大阪支社' then '関西'
 else 'その他'
end as '在籍地域' /*CASE 式で取得した列の名前*/
 from 社員


実行結果

SQL Server 2014 に Northwind データベース(日本語版)をインストール

日本語版の Northwind データベースをインストールする方法をメモします。

SQLQuality さんという会社がデータベースのスクリプトファイルを公開して下さっているので、ありがたく利用させて頂きました。


1.SQL スクリプトの取得

SQL Server 2014 自習書シリーズ (HTML 版) 「No.5 Microsoft Azure SQL Database 入門」
http://www.sqlquality.com/Self2014/Self2014_AzureSQLDB/Text/Step04-02.html

→「サンプル スクリプト」というリンクに「NorthwindJ.sql」が含まれていますので、テキストエディタで開きます。NorthwindJ.sql に含まれる SQL 文を全部コピーします。

※ Northwind(英語版)のスクリプトはこちらで公開されています。


2.SQL Server Management Studio で SQL 文を実行

「新しいクエリ」をクリックし、クエリエディターを開きます。
1でコピーした SQL 文をクエリエディターに貼り付け、「実行」をクリックします。(もしくは NorthwindJ.sql を Management Studio で直接開いて実行しても OK です。)

→クエリを実行し、完了となれば終わりです。

2017年1月14日土曜日

Windows Forms TextBox フォーカスイベント

TextBox にフォーカスが当たったタイミングで TextBox 内のテキストを全選択するロジックを実装する方法です。TextBox の GotFocus イベントにイベントハンドラを指定します。

public Form1()
{
    InitializeComponent();

    this.id.GotFocus += GotFocus;
}

private void GotFocus(object sender, EventArgs e)
{
    TextBox t = sender as TextBox;
    t.SelectAll();
}

2016年11月25日金曜日

WPF TreeView と RichTextBox

TreeView と RichTextBox を連携するサンプルを作成しました。

TreeView で選択したノードを RichTextBox に表示しています。TreeView のノードを選択したタイミングで発生する SelectedItemChanged イベントをハンドルし、コマンド経由で ViewModel 側の選択ノードを切り替えています。

2016年11月23日水曜日

WPF コマンド簡易例

コマンドの実装例をメモします。

<Window x:Class="WpfApplication5.CommandTest"
        xmlns="http://schemas.microsoft.com/winfx/2006/xaml/presentation"
        xmlns:x="http://schemas.microsoft.com/winfx/2006/xaml"
        xmlns:d="http://schemas.microsoft.com/expression/blend/2008"
        xmlns:mc="http://schemas.openxmlformats.org/markup-compatibility/2006"
        xmlns:local="clr-namespace:WpfApplication5"
        mc:Ignorable="d"
        Title="CommandTest" Height="150" Width="300">
    <Grid>
        <TextBox x:Name="textBox"
                 HorizontalAlignment="Left"
                 Height="23"
                 Text="{Binding MyText}"
                 Width="120"/>
        <Button x:Name="button"
                Content="Clear Text"
                Command="{Binding ClearText}"
                CommandParameter="{Binding ElementName=textBox}"
                HorizontalAlignment="Left"
                Width="75"
                Margin="125,0,0,0" Height="23"/>
    </Grid>
</Window>

using System;
using System.Windows;
using System.Windows.Controls;
using System.Windows.Input;

namespace WpfApplication5
{
    public partial class CommandTest : Window
    {
        public CommandTest()
        {
            InitializeComponent();

            MyData data = new MyData();
            data.MyText = "123 test";

            this.DataContext = data;
        }
    }

    public class MyData : NotificationObject
    {
        private string _MyText;
        public string MyText
        {
            get
            {
                return _MyText;
            }
            set
            {
                this._MyText = value;
                this.OnPropertyChanged();
            }
        }

        private ClearTextCommand _ClearText;
        public ClearTextCommand ClearText {
            get{
                if(_ClearText == null)
                {
                    _ClearText = new ClearTextCommand();
                }
                return _ClearText;
            }
        }
    }

    public class ClearTextCommand : ICommand
    {
        public event EventHandler CanExecuteChanged;

        public bool CanExecute(object parameter)
        {
            return true;
        }

        public void Execute(object parameter)
        {
            TextBox textBox = parameter as TextBox;
            textBox?.Clear();
        }
    }
}

INotifyPropertyChanged 実装サンプル(C# 6)

INotifyPropertyChanged の実装サンプルです。

バインディングソースに CLR オブジェクトを利用する際、バインディングターゲットの変更を通知するためには、INotifyPropertyChanged インターフェイスを実装します。

C# 6 で導入された Null 条件演算子を利用して OnPropertyChanged の実装を簡潔に記述することができるようになっています。
public class NotificationObject : INotifyPropertyChanged
{
    /// <summary>
    /// プロパティ値の変更をクライアントに通知する。
    /// </summary>
    public event PropertyChangedEventHandler PropertyChanged;

    /// <summary>
    /// PropertyChanged イベント を発生させる。
    /// </summary>
    /// <param name="propertyName">変更されたプロパティ名</param>
    protected void OnPropertyChanged([CallerMemberName] string propertyName = "")
    {
        // C# 6 の Null 条件演算子を利用
        this.PropertyChanged?.Invoke(this, new PropertyChangedEventArgs(propertyName));
        
        // C# 6 以前
        //if (this.PropertyChanged != null)
        //{
        //    this.PropertyChanged(this, new PropertyChangedEventArgs(propertyName));
        //}
    }
}
public class MyClass : NotificationObject
{
    private string _text;
    public string Text {
        get {
            return _text;
        }
        set {
            this._text = value;
            this.OnPropertyChanged();
        }
    }
    public MyClass()
    {

    }
}
Null 条件演算子 (C# および Visual Basic)
https://msdn.microsoft.com/ja-jp/library/dn986595?f=255&MSPPError=-2147217396

2016年11月22日火曜日

WPF ItemsControl 仮想化

ItemsControl の仮想化を実装してみました。ControlTemplate の部分は TextBox のテンプレートを流用しています。

MSDNStackOverflow の情報を合わせると、下記のようになるのかなと思われます。

<ItemsControl
    VirtualizingStackPanel.IsVirtualizing="True"
    ScrollViewer.CanContentScroll="True"
    ItemsSource="{Binding Tasks}">
    <ItemsControl.ItemTemplate>
        <DataTemplate>
            <StackPanel Orientation="Horizontal">
                <TextBlock Text="{Binding Path=ID}" />
                <TextBlock Text="{Binding Path=Title}" />
            </StackPanel>
        </DataTemplate>
    </ItemsControl.ItemTemplate>
    <ItemsControl.ItemsPanel>
        <ItemsPanelTemplate>
            <VirtualizingStackPanel />
        </ItemsPanelTemplate>
    </ItemsControl.ItemsPanel>
    <ItemsControl.Template>
        <ControlTemplate>
            <Border x:Name="Bd" BorderBrush="{TemplateBinding BorderBrush}" BorderThickness="{TemplateBinding BorderThickness}" Background="{TemplateBinding Background}" Padding="1" SnapsToDevicePixels="true">
                <ScrollViewer Focusable="false" Padding="{TemplateBinding Padding}">
                    <ItemsPresenter SnapsToDevicePixels="{TemplateBinding SnapsToDevicePixels}"/>
                </ScrollViewer>
            </Border>
        </ControlTemplate>
    </ItemsControl.Template>
</ItemsControl>


Virtualizing an ItemsControl?
http://stackoverflow.com/questions/2783845/virtualizing-an-itemscontrol

パフォーマンスの最適化 : コントロール
https://msdn.microsoft.com/ja-jp/library/cc716879.aspx

2016年11月21日月曜日

WPF 依存関係プロパティ

こちらのサイトを参考にさせていただき、依存関係プロパティ作成の練習をしてみました。
ソースコードは下記サイトの方のものと非常に似たものになってしまいました...。

tips - 独自の依存関係プロパティを作成する
http://yujiro15.net/YKSoftware/tips_DependencyProperty.html


LabelInput.xaml.cs

"propdp" と入力し、Tab を2回押すとスニペットが自動で挿入されて雛形が出来上がります。プロパティの型情報、名前、プロパティを所有するクラス、プロパティのデフォルト値をそれぞれ変更していきます。PropertyMetadata の第1引数にはデフォルト値を、第2引数にはプロパティの変更通知を捕捉することができます。

public partial class LabelInput : UserControl
{
    public LabelInput()
    {
        InitializeComponent();
    }

    public string Text
    {
        get { return (string)GetValue(TextProperty); }
        set { SetValue(TextProperty, value); }
    }

    // Using a DependencyProperty as the backing store for Text.  This enables animation, styling, binding, etc...
    public static readonly DependencyProperty TextProperty =
        DependencyProperty.Register("Text", typeof(string), typeof(LabelInput), new PropertyMetadata("Text", TextChanged));

    private static void TextChanged(DependencyObject d, DependencyPropertyChangedEventArgs e)
    {
        
    }
    

    public string Value
    {
        get { return (string)GetValue(ValueProperty); }
        set { SetValue(ValueProperty, value); }
    }

    // Using a DependencyProperty as the backing store for Value.  This enables animation, styling, binding, etc...
    public static readonly DependencyProperty ValueProperty =
        DependencyProperty.Register("Value", typeof(string), typeof(LabelInput), new PropertyMetadata("Value", ValueChanged));

    private static void ValueChanged(DependencyObject d, DependencyPropertyChangedEventArgs e)
    {
        
    }
}

LabelInput.xaml

Text プロパティと Value プロパティには、バインディングで外部から設定される値を参照しています。

<UserControl x:Class="MyPropertyTest.LabelInput"
             xmlns="http://schemas.microsoft.com/winfx/2006/xaml/presentation"
             xmlns:x="http://schemas.microsoft.com/winfx/2006/xaml"
             xmlns:mc="http://schemas.openxmlformats.org/markup-compatibility/2006" 
             xmlns:d="http://schemas.microsoft.com/expression/blend/2008" 
             xmlns:local="clr-namespace:MyPropertyTest"
             mc:Ignorable="d" Height="24.812" Width="173.684">
    <Grid>
        <Grid.ColumnDefinitions>
            <ColumnDefinition Width="28*"/>
            <ColumnDefinition Width="59*"/>
        </Grid.ColumnDefinitions>
        <TextBlock x:Name="label"
               Text="{Binding Text, RelativeSource={RelativeSource FindAncestor, AncestorType={x:Type local:LabelInput}}, StringFormat='{}{0} : '}"
               Grid.Column="0"/>
        <TextBox x:Name="textBox"
                 TextWrapping="Wrap"
                 Text="{Binding Value, RelativeSource={RelativeSource FindAncestor, AncestorType={x:Type local:LabelInput}}}"
                 Grid.Column="1"/>

    </Grid>
</UserControl>


MainWindow.xaml

Text プロパティと Value プロパティの設定例です。

<local:LabelInput HorizontalAlignment="Left"
                  VerticalAlignment="Top"
                  Text="名前"
                  Value="としひこ"/>
<local:LabelInput HorizontalAlignment="Left"
                  VerticalAlignment="Top"
                  Text="名前"
                  Value="よしひこ" Width="174" Margin="0,25,0,0"/>

2016年9月23日金曜日

innerText と textContent の違い

innerText ・・・ エンドユーザーから見えている情報を返す。

textContent ・・・ 改行や script タグを含めた情報を返す。

例えば、下記の HTML があった場合の innerText と textContent の取得結果を比較してみましょう。

<div id="myDiv">
    <div>Lorem ipsum dolor sit amet,
    consectetur</div>
    <script>console.log("aaa---aaa");</script>
    <style>*{background-color:transparent;}</style>
    <div style="visibility:hidden"> adipiscing elit</div>
</div>

<input type="button" id="button1" value="innerText"/>
<input type="button" id="button2" value="textContent"/>

コンソールに出力した結果を見てみます。

--- innerText ---
Lorem ipsum dolor sit amet, consectetur


  • エンドユーザーから見えているとおりの情報が取得されます。script タグ、style タグは含まれません。
  • style が評価された結果が取得されています。このため style により非表示になっている部分は含まれていません。


--- textContent ---
            Lorem ipsum dolor sit amet,
            consectetur
            console.log("aaa---aaa");
         
            *{background-color:transparent;}
             adipiscing elit


  • エンドユーザーから見えていない情報が含まれています。script タグ、style タグが含まれています。
  • 改行や空白文字もそのまま含んでいます。
  • innerText とは異なり、style は評価される前の情報になります。


リファレンス
MDN - Node.textContent

2016年9月22日木曜日

擬似クラスと擬似要素

今日は CSS の基礎をおさらいしていました。

疑似クラス (Pseudo-classes)
https://developer.mozilla.org/ja/docs/Web/CSS/pseudo-classes

疑似要素 (Pseudo-elements)
https://developer.mozilla.org/ja/docs/Web/CSS/pseudo-elements

疑似要素の "::after" や "::before" の意味を理解してすっきりしました。"::first-letter" もものすごい使いやすくていいですね。