ASP.NET MVC の学習で役に立ったリソースの一覧です。
ASP.NET MVC5実践プログラミング
https://www.amazon.co.jp/dp/4798041793
プログラミングMicrosoft ASP.NET MVC 第3版
https://www.amazon.co.jp/dp/4822298388
The Complete ASP.NET MVC 5 Course(英語)
https://www.udemy.com/the-complete-aspnet-mvc-5-course/
2018年5月2日水曜日
2018年4月21日土曜日
ASP.NET MVC で URL からコントローラー名を隠す
2018/04/23 追記
ふと、属性ルーティングで済むのではないかと思い、試してみました。結果、うまくいきました。
RegisterRoutes 内で、MapMvcAttributeRoutes を呼び出します。デフォルトで定義されている MapRoute は、必要がなければ削除(コメントアウト)します。
続いて、ルート属性を利用して、指定します。ルートの ”/”、”/Articles”、”/Articles/Index” で Index アクションにアクセスできるように属性を 3 つ設定しています。
しかも、最初に参照していた stackoverflow のスレッドにも、この属性ルーティングの方法が提案されていました。よく読みましょう... (^^;)
https://stackoverflow.com/a/39948890
2018/04/22
タイトルのままです。ASP.NET MVC で URL からコントローラー名を隠す方法を調べてみました。結果、ルーティングを設定することで解決しました。
参考:ASP.NET MVC - Removing controller name from URL
https://stackoverflow.com/questions/3337372/asp-net-mvc-removing-controller-name-from-url
ふと、属性ルーティングで済むのではないかと思い、試してみました。結果、うまくいきました。
RegisterRoutes 内で、MapMvcAttributeRoutes を呼び出します。デフォルトで定義されている MapRoute は、必要がなければ削除(コメントアウト)します。
public class RouteConfig
{
    public static void RegisterRoutes(RouteCollection routes)
    {
        routes.IgnoreRoute("{resource}.axd/{*pathInfo}");

        //属性ルーティングの有効化
        routes.MapMvcAttributeRoutes();

        //"Home" や "Home/Index" にアクセスする必要がなければ削除
        //routes.MapRoute(
        //    name: "Default",
        //    url: "{controller}/{action}/{id}",
        //    defaults: new { controller = "Home", action = "Index", id = UrlParameter.Optional }
        //);
    }
}
続いて、ルート属性を利用して、指定します。ルートの ”/”、”/Articles”、”/Articles/Index” で Index アクションにアクセスできるように属性を 3 つ設定しています。
public class ArticlesController : Controller
{
    [Route("~/")]
    [Route("Articles")]
    [Route("Articles/Index")]
    public ActionResult Index()
    {
        return View();
    }
}
しかも、最初に参照していた stackoverflow のスレッドにも、この属性ルーティングの方法が提案されていました。よく読みましょう... (^^;)
https://stackoverflow.com/a/39948890
2018/04/22
タイトルのままです。ASP.NET MVC で URL からコントローラー名を隠す方法を調べてみました。結果、ルーティングを設定することで解決しました。
public class RouteConfig
{
    public static void RegisterRoutes(RouteCollection routes)
    {
        routes.IgnoreRoute("{resource}.axd/{*pathInfo}");
        //MyRoute を追加。コントローラー名を指定していないリクエストは、Articles コントローラーで捕捉
        routes.MapRoute(
            "MyRoute",
            "{action}/{id}",
            new
            {
                controller = "Articles",
                action = "Index",
                id = UrlParameter.Optional
            }
        );

        routes.MapRoute(
            name: "Default",
            url: "{controller}/{action}/{id}",
            defaults: new { controller = "Home", action = "Index", id = UrlParameter.Optional }
        );
    }
}
参考:ASP.NET MVC - Removing controller name from URL
https://stackoverflow.com/questions/3337372/asp-net-mvc-removing-controller-name-from-url
2018年3月27日火曜日
ASP.NET Web API で JSON を返す方法
ASP.NET Web API で JSON を返す実装例です。
1.WebApiConfig クラス内で "text/html" フォーマットをリターンするようにします。
2.Request.CreateReponse メソッドに、ステータスコードと、モデルのリストを渡します。すると、クライアントには JSON がリターンされます。
1.WebApiConfig クラス内で "text/html" フォーマットをリターンするようにします。
public static class WebApiConfig
{
    public static void Register(HttpConfiguration config)
    {
        // Web API の設定およびサービス
        ...

        //json を返す
        //https://stackoverflow.com/a/13277616
        config.Formatters.JsonFormatter.SupportedMediaTypes
            .Add(new MediaTypeHeaderValue("text/html"));
    }
}
2.Request.CreateReponse メソッドに、ステータスコードと、モデルのリストを渡します。すると、クライアントには JSON がリターンされます。
public class ProductsController : ApiController
{
    ...

    public HttpResponseMessage Get()
    {
        IList<IProduct> products = _rep.GetAll();

        //モデルリストから JSON に変換
        //Content Negotiation in ASP.NET Web API
        //https://docs.microsoft.com/en-us/aspnet/web-api/overview/formats-and-model-binding/content-negotiation#serialization
        return Request.CreateResponse(HttpStatusCode.OK, products);
    }
}
2017年10月2日月曜日
ASP.NET Web API で JSON を取得する方法
Web API で JSON を取得する実装例です。
View:
Controller:
View:
<input type="button" id="apiButton" class="btn" value="Web Api Test" />

<script>
    function asyncCall() {
        var xhr = new XMLHttpRequest();
        xhr.onreadystatechange = function () {
            if ((xhr.readyState === 4) && (xhr.status === 200)) {
                var json = xhr.response;
                console.log(json);
            }
        }
        xhr.open("GET", "/api/values", true);
        xhr.send(null);
    }

    var button1 = document.getElementById("apiButton");
    button1.addEventListener("click", asyncCall, false);
</script>
Controller:
public class Item
{
    public int Id { get; set; }

    public string Name { get; set; }

    public DateTime RegisteredOn { get; set; }

    public int CategoryId { get; set; }
}


public class ValuesController : ApiController
{
    // GET api/values
    public IEnumerable<Item> Get()
    {
        List<Item> items = new List<Item>();
        items.Add(new Item { Id = 1, Name = "Toshihiko", CategoryId = 1, RegisteredOn = DateTime.Today });
        items.Add(new Item { Id = 2, Name = "Takashi", CategoryId = 1, RegisteredOn = DateTime.Today });
        return items;
    }
}
2017年9月11日月曜日
ASP.NET MVC, ASP.NET Web API でのデータベース接続
ASP.NET MVC、ASP.NET Web API 両方で同じ設定が可能です。
Web.config
App_Data フォルダに DB1.mdb がある状態で、下記のように connectionString を設定します。
<connectionStrings>
  <!--a database file(mdf, ldf) will be created in App_Data folder of the project and attach to SQL Server-->
  <add name="DataContext" connectionString="Data Source=(LocalDB)\MSSQLLocalDB;AttachDbFilename=|DataDirectory|\DB1.mdf;Integrated Security=True;MultipleActiveResultSets=True;App=EntityFramework" providerName="System.Data.SqlClient" />
</connectionStrings>
C# コードでは、Web.config で設定した接続文字列を使ってデータベースへ接続します。
var str = ConfigurationManager.ConnectionStrings["DataContext"].ConnectionString;

using (SqlConnection connection = new SqlConnection(str))
{
    connection.Open();
    using (SqlCommand command = new SqlCommand("Select * from dbo.incident;", connection))
    {
        SqlDataReader dr = command.ExecuteReader();
        while (dr.Read())
        {
            Debug.WriteLine(dr.GetValue(1).ToString());
        }
        dr.Close();
    }
}
2017年5月17日水曜日
ASP.NET MVC クライアントサイドの検証機能
ASP.NET MVC のクライアントサイドの検証機能を実装する例です。
前提として、ASP.NET MVC プロジェクトの App_Start/BundleConfig.cs にある RegisterBundles メソッドに jquery.validate.js が登録されていることを確認します。
また、_Layout.cshtml や表示するビューに jquery.validate.js が参照追加されていることを確認します。
それでは簡単にモデルクラスを用意します。
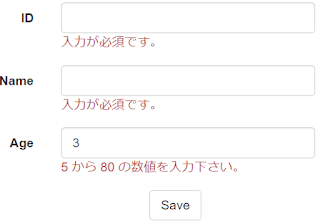
Person クラスのプロパティにデータアノテーションを指定します。Required は必須入力項目となります。Range は引数で指定された数値の範囲を有効な値として取ります。ここの例にある Age プロパティでは 5 から 80 までが有効な値になります。
Person クラスのインスタンスを生成します。
続いて、View 側でモデルを表示するユーザーコントロールを定義します。
ID、Name、Age 項目それぞれに入力検証が行われるようになりました。エラー状態では Save ボタンによるフォーム送信ができない状態になっています。
前提として、ASP.NET MVC プロジェクトの App_Start/BundleConfig.cs にある RegisterBundles メソッドに jquery.validate.js が登録されていることを確認します。
public static void RegisterBundles(BundleCollection bundles)
{
    ...

    bundles.Add(new ScriptBundle("~/bundles/jqueryval").Include(
                "~/Scripts/jquery.validate*"));
また、_Layout.cshtml や表示するビューに jquery.validate.js が参照追加されていることを確認します。
@Scripts.Render("~/bundles/jquery")
@Scripts.Render("~/bundles/jqueryval")
@Scripts.Render("~/bundles/bootstrap")
@RenderSection("scripts", required: false)
それでは簡単にモデルクラスを用意します。
Person クラスのプロパティにデータアノテーションを指定します。Required は必須入力項目となります。Range は引数で指定された数値の範囲を有効な値として取ります。ここの例にある Age プロパティでは 5 から 80 までが有効な値になります。
namespace ValidationTest.Models
{
    public class Person
    {
        [Required(ErrorMessage = "入力が必須です。")]
        public int ID { get; set; }

        [Required(ErrorMessage = "入力が必須です。")]
        public string Name { get; set; }

        [Required(ErrorMessage = "入力が必須です。")]
        [Range(5, 80, ErrorMessage ="5 から 80 の数値を入力下さい。")]
        public int Age { get; set; }
    }
}
Person クラスのインスタンスを生成します。
namespace ValidationTest.Controllers
{
    public class HomeController : Controller
    {
        public ActionResult Index()
        {
            Person p = new Person();
            p.ID = 1;
            //p.Name = "toshihiko";
            p.Age = 19;

            return View(p);
        }

        ...
    }
}
続いて、View 側でモデルを表示するユーザーコントロールを定義します。
@model ValidationTest.Models.Person
...

@using (Html.BeginForm())
{
    <div class="form-horizontal">
        Person
        <div class="form-group">
            @Html.LabelFor(model => model.ID, htmlAttributes: new { @class = "control-label col-md-1" })
            <div class="col-md-10">
                @Html.EditorFor(model => model.ID, new { htmlAttributes = new { @class = "form-control" } })
                @Html.ValidationMessageFor(model => model.ID, "", new { @class = "text-danger" })
            </div>
        </div>

        <div class="form-group">
            @Html.LabelFor(model => model.Name, htmlAttributes: new { @class = "control-label col-md-1" })
            <div class="col-md-10">
                @Html.EditorFor(model => model.Name, new { htmlAttributes = new { @class = "form-control" } })
                @Html.ValidationMessageFor(model => model.Name, "", new { @class = "text-danger" })
            </div>
        </div>

        <div class="form-group">
            @Html.LabelFor(model => model.Age, htmlAttributes: new { @class = "control-label col-md-1" })
            <div class="col-md-10">
                @Html.EditorFor(model => model.Age, new { htmlAttributes = new { @class = "form-control" } })
                @Html.ValidationMessageFor(model => model.Age, "", new { @class = "text-danger" })
            </div>
        </div>

        <div class="form-group">
            <div class="col-md-offset-2 col-md-1">
                <input type="submit" value="Save" class="btn btn-default" />
            </div>
        </div>
    </div>
}
ID、Name、Age 項目それぞれに入力検証が行われるようになりました。エラー状態では Save ボタンによるフォーム送信ができない状態になっています。

2017年4月5日水曜日
ASP.NET Web API の実装例
ASP.NET Web API の簡単な雛形を作ってみました。
クライアントサイドの実装:
ボタンをクリックして、Web API を呼び出しています。
サーバーサイドの実装:
ダミーデータからパラメーターとして渡される id からデータを割り出してクライアントへ返します。
実行結果:

クライアントサイドの実装:
ボタンをクリックして、Web API を呼び出しています。
<input type="button" id="apiButton" class="btn" value="Web Api Test"/>

@section scripts{
    <script>

        function asyncCall() {
            var xhr = new XMLHttpRequest();
            xhr.onreadystatechange = function () {
                if ((xhr.readyState === 4) && (xhr.status === 200)) {
                    var json = xhr.response;
                    console.log(json);
                }
            }
            xhr.open("GET", "/api/items/1", true);
            xhr.send(null);
        }

        var button1 = document.getElementById("apiButton");
        button1.addEventListener("click", asyncCall, false);

    </script>
}
サーバーサイドの実装:
ダミーデータからパラメーターとして渡される id からデータを割り出してクライアントへ返します。
using System;
using System.Collections.Generic;
using System.Linq;
using System.Net;
using System.Net.Http;
using System.Web.Http;

namespace WebApi.Controllers
{
    public class ItemsController : ApiController
    {
        public IEnumerable<Item> getItem(int id)
        {
            var allItems = getAllItems();
            var item = allItems.Where(x => x.Id == id);
            return item;
        }

        private IEnumerable<Item> getAllItems()
        {
            List<Item> items = new List<Item>();
            items.Add(new Item { Id = 1, Name = "My Item 1", RegisteredOn = DateTime.Today.AddDays(-2), CategoryId = 1 });
            items.Add(new Item { Id = 2, Name = "My Item 2", RegisteredOn = DateTime.Today.AddDays(-3), CategoryId = 2 });
            return items;
        }
    }

    public class Item
    {
        public int Id { get; set; }

        public string Name { get; set; }

        public DateTime RegisteredOn { get; set; }

        public int CategoryId { get; set; }
    }
}
実行結果:
2017年4月1日土曜日
ASP.NET MVC ActionLink の fragment を付ける方法
ActionLink に fragment を付ける方法を調べたところ、下記のような実装方法がありました。
cshtml での実装
出力結果はこんな感じです。
http://localhost/MyController/MyAction#fragmentString
Including an anchor tag in an ASP.NET MVC Html.ActionLink
http://stackoverflow.com/questions/274586/including-an-anchor-tag-in-an-asp-net-mvc-html-actionlink/274637#274637
cshtml での実装
@Html.ActionLink($"Link Text", "MyAction",
"MyController", null, null, "fragmentString", null, null)
出力結果はこんな感じです。
http://localhost/MyController/MyAction#fragmentString
Including an anchor tag in an ASP.NET MVC Html.ActionLink
http://stackoverflow.com/questions/274586/including-an-anchor-tag-in-an-asp-net-mvc-html-actionlink/274637#274637
2017年3月26日日曜日
ASP.NET MVC でデータベースにテーブルを追加する方法
まずはモデルを用意します。
続いて、Application_Start() 内で、Database.SetInitializer メソッドにデータイニシャライザーを生成して渡します。
データベースとモデルの紐づけは DbContext 継承クラス内で行います。
public class MyModel
{
    public int Id { get; set; }
    public string Description { get; set; }
}
続いて、Application_Start() 内で、Database.SetInitializer メソッドにデータイニシャライザーを生成して渡します。
public class MvcApplication : System.Web.HttpApplication
{
    protected void Application_Start()
    {
        ...
        Database.SetInitializer<DataContext>(new DataInitializer());
        ...
    }
}
データベースとモデルの紐づけは DbContext 継承クラス内で行います。
public partial class DataContext : DbContext
{
    public DataContext()
        : base("name=DataContext")
    {
    }

    //モデル
    public virtual DbSet<MyModel> MyModels { get; set; }

    protected override void OnModelCreating(DbModelBuilder modelBuilder)
    {
        ...
        modelBuilder.Entity<MyModel>();
    }
}
登録:
投稿 (Atom)