2016年11月23日水曜日

INotifyPropertyChanged 実装サンプル(C# 6)

INotifyPropertyChanged の実装サンプルです。

バインディングソースに CLR オブジェクトを利用する際、バインディングターゲットの変更を通知するためには、INotifyPropertyChanged インターフェイスを実装します。

C# 6 で導入された Null 条件演算子を利用して OnPropertyChanged の実装を簡潔に記述することができるようになっています。
public class NotificationObject : INotifyPropertyChanged
{
    /// <summary>
    /// プロパティ値の変更をクライアントに通知する。
    /// </summary>
    public event PropertyChangedEventHandler PropertyChanged;

    /// <summary>
    /// PropertyChanged イベント を発生させる。
    /// </summary>
    /// <param name="propertyName">変更されたプロパティ名</param>
    protected void OnPropertyChanged([CallerMemberName] string propertyName = "")
    {
        // C# 6 の Null 条件演算子を利用
        this.PropertyChanged?.Invoke(this, new PropertyChangedEventArgs(propertyName));
        
        // C# 6 以前
        //if (this.PropertyChanged != null)
        //{
        //    this.PropertyChanged(this, new PropertyChangedEventArgs(propertyName));
        //}
    }
}
public class MyClass : NotificationObject
{
    private string _text;
    public string Text {
        get {
            return _text;
        }
        set {
            this._text = value;
            this.OnPropertyChanged();
        }
    }
    public MyClass()
    {

    }
}
Null 条件演算子 (C# および Visual Basic)
https://msdn.microsoft.com/ja-jp/library/dn986595?f=255&MSPPError=-2147217396

2016年11月22日火曜日

WPF ItemsControl 仮想化

ItemsControl の仮想化を実装してみました。ControlTemplate の部分は TextBox のテンプレートを流用しています。

MSDN と StackOverflow の情報を合わせると、下記のようになるのかなと思われます。

<ItemsControl
    VirtualizingStackPanel.IsVirtualizing="True"
    ScrollViewer.CanContentScroll="True"
    ItemsSource="{Binding Tasks}">
    <ItemsControl.ItemTemplate>
        <DataTemplate>
            <StackPanel Orientation="Horizontal">
                <TextBlock Text="{Binding Path=ID}" />
                <TextBlock Text="{Binding Path=Title}" />
            </StackPanel>
        </DataTemplate>
    </ItemsControl.ItemTemplate>
    <ItemsControl.ItemsPanel>
        <ItemsPanelTemplate>
            <VirtualizingStackPanel />
        </ItemsPanelTemplate>
    </ItemsControl.ItemsPanel>
    <ItemsControl.Template>
        <ControlTemplate>
            <Border x:Name="Bd" BorderBrush="{TemplateBinding BorderBrush}" BorderThickness="{TemplateBinding BorderThickness}" Background="{TemplateBinding Background}" Padding="1" SnapsToDevicePixels="true">
                <ScrollViewer Focusable="false" Padding="{TemplateBinding Padding}">
                    <ItemsPresenter SnapsToDevicePixels="{TemplateBinding SnapsToDevicePixels}"/>
                </ScrollViewer>
            </Border>
        </ControlTemplate>
    </ItemsControl.Template>
</ItemsControl>


Virtualizing an ItemsControl?
http://stackoverflow.com/questions/2783845/virtualizing-an-itemscontrol

パフォーマンスの最適化 : コントロール
https://msdn.microsoft.com/ja-jp/library/cc716879.aspx

2016年11月21日月曜日

WPF 依存関係プロパティ

こちらのサイトを参考にさせていただき、依存関係プロパティ作成の練習をしてみました。
ソースコードは下記サイトの方のものと非常に似たものになってしまいました...。

tips - 独自の依存関係プロパティを作成する
http://yujiro15.net/YKSoftware/tips_DependencyProperty.html


LabelInput.xaml.cs

"propdp" と入力し、Tab を2回押すとスニペットが自動で挿入されて雛形が出来上がります。プロパティの型情報、名前、プロパティを所有するクラス、プロパティのデフォルト値をそれぞれ変更していきます。PropertyMetadata の第1引数にはデフォルト値を、第2引数にはプロパティの変更通知を捕捉することができます。

public partial class LabelInput : UserControl
{
    public LabelInput()
    {
        InitializeComponent();
    }

    public string Text
    {
        get { return (string)GetValue(TextProperty); }
        set { SetValue(TextProperty, value); }
    }

    // Using a DependencyProperty as the backing store for Text.  This enables animation, styling, binding, etc...
    public static readonly DependencyProperty TextProperty =
        DependencyProperty.Register("Text", typeof(string), typeof(LabelInput), new PropertyMetadata("Text", TextChanged));

    private static void TextChanged(DependencyObject d, DependencyPropertyChangedEventArgs e)
    {
        
    }
    

    public string Value
    {
        get { return (string)GetValue(ValueProperty); }
        set { SetValue(ValueProperty, value); }
    }

    // Using a DependencyProperty as the backing store for Value.  This enables animation, styling, binding, etc...
    public static readonly DependencyProperty ValueProperty =
        DependencyProperty.Register("Value", typeof(string), typeof(LabelInput), new PropertyMetadata("Value", ValueChanged));

    private static void ValueChanged(DependencyObject d, DependencyPropertyChangedEventArgs e)
    {
        
    }
}

LabelInput.xaml

Text プロパティと Value プロパティには、バインディングで外部から設定される値を参照しています。

<UserControl x:Class="MyPropertyTest.LabelInput"
             xmlns="http://schemas.microsoft.com/winfx/2006/xaml/presentation"
             xmlns:x="http://schemas.microsoft.com/winfx/2006/xaml"
             xmlns:mc="http://schemas.openxmlformats.org/markup-compatibility/2006" 
             xmlns:d="http://schemas.microsoft.com/expression/blend/2008" 
             xmlns:local="clr-namespace:MyPropertyTest"
             mc:Ignorable="d" Height="24.812" Width="173.684">
    <Grid>
        <Grid.ColumnDefinitions>
            <ColumnDefinition Width="28*"/>
            <ColumnDefinition Width="59*"/>
        </Grid.ColumnDefinitions>
        <TextBlock x:Name="label"
               Text="{Binding Text, RelativeSource={RelativeSource FindAncestor, AncestorType={x:Type local:LabelInput}}, StringFormat='{}{0} : '}"
               Grid.Column="0"/>
        <TextBox x:Name="textBox"
                 TextWrapping="Wrap"
                 Text="{Binding Value, RelativeSource={RelativeSource FindAncestor, AncestorType={x:Type local:LabelInput}}}"
                 Grid.Column="1"/>

    </Grid>
</UserControl>


MainWindow.xaml

Text プロパティと Value プロパティの設定例です。

<local:LabelInput HorizontalAlignment="Left"
                  VerticalAlignment="Top"
                  Text="名前"
                  Value="としひこ"/>
<local:LabelInput HorizontalAlignment="Left"
                  VerticalAlignment="Top"
                  Text="名前"
                  Value="よしひこ" Width="174" Margin="0,25,0,0"/>

2016年9月23日金曜日

innerText と textContent の違い

innerText ・・・ エンドユーザーから見えている情報を返す。

textContent ・・・ 改行や script タグを含めた情報を返す。

例えば、下記の HTML があった場合の innerText と textContent の取得結果を比較してみましょう。

<div id="myDiv">
    <div>Lorem ipsum dolor sit amet,
    consectetur</div>
    <script>console.log("aaa---aaa");</script>
    <style>*{background-color:transparent;}</style>
    <div style="visibility:hidden"> adipiscing elit</div>
</div>

<input type="button" id="button1" value="innerText"/>
<input type="button" id="button2" value="textContent"/>

コンソールに出力した結果を見てみます。

--- innerText ---
Lorem ipsum dolor sit amet, consectetur


  • エンドユーザーから見えているとおりの情報が取得されます。script タグ、style タグは含まれません。
  • style が評価された結果が取得されています。このため style により非表示になっている部分は含まれていません。


--- textContent ---
            Lorem ipsum dolor sit amet,
            consectetur
            console.log("aaa---aaa");
         
            *{background-color:transparent;}
             adipiscing elit


  • エンドユーザーから見えていない情報が含まれています。script タグ、style タグが含まれています。
  • 改行や空白文字もそのまま含んでいます。
  • innerText とは異なり、style は評価される前の情報になります。


リファレンス
MDN - Node.textContent

2016年9月22日木曜日

擬似クラスと擬似要素

今日は CSS の基礎をおさらいしていました。

疑似クラス (Pseudo-classes)
https://developer.mozilla.org/ja/docs/Web/CSS/pseudo-classes

疑似要素 (Pseudo-elements)
https://developer.mozilla.org/ja/docs/Web/CSS/pseudo-elements

疑似要素の "::after" や "::before" の意味を理解してすっきりしました。"::first-letter" もものすごい使いやすくていいですね。

2016年7月9日土曜日

JavaScript によるバブルソートの実装

JavaScript でバブルソートの実装を行ってみました。

window.onload = function(){
  var array = [90, 65, 37, 23, 17, 15];
  console.log("始めの値  : " + array.toString());

  do {
    var flag = false;

    for(var i = 0; i < array.length-1; i++)
    {
      if(array[i] > array[i+1])
      {
        var tmp = array[i];
        array[i] = array[i+1];
        array[i+1] = tmp;
        flag = true;

        console.log("ループ後  : " + array.toString());
      }
    }
  } while (flag == true);
}

実行結果はこちら。

始めの値  : 90,65,37,23,17,15
ループ後  : 65,90,37,23,17,15
ループ後  : 65,37,90,23,17,15
ループ後  : 65,37,23,90,17,15
ループ後  : 65,37,23,17,90,15
ループ後  : 65,37,23,17,15,90
ループ後  : 37,65,23,17,15,90
ループ後  : 37,23,65,17,15,90
ループ後  : 37,23,17,65,15,90
ループ後  : 37,23,17,15,65,90
ループ後  : 23,37,17,15,65,90
ループ後  : 23,17,37,15,65,90
ループ後  : 23,17,15,37,65,90
ループ後  : 17,23,15,37,65,90
ループ後  : 17,15,23,37,65,90
ループ後  : 15,17,23,37,65,90

2016年5月21日土曜日

xampp for linux コントロールパネル表示方法

このコマンドで開きます。

sudo /opt/lampp/manager-linux-x64.run

linux マウスカーソルの移動速度を変更する


まずは、マウスのデバイス ID を調べます。

ターミナルを開き、「xinput」と入力します。するとこんな感じでデバイスを確認できます。

xxx@xxx-mint ~ $ xinput
⎡ Virtual core pointer                     id=2 [master pointer  (3)]
⎜   ↳ Virtual core XTEST pointer               id=4 [slave  pointer  (2)]
⎜   ↳ Microsoft  Microsoft Basic Optical Mouse v2.0 id=9 [slave  pointer  (2)]
⎜   ↳ SynPS/2 Synaptics TouchPad               id=11 [slave  pointer  (2)]
⎣ Virtual core keyboard                   id=3 [master keyboard (2)]
    ↳ Virtual core XTEST keyboard             id=5 [slave  keyboard (3)]
    ↳ Power Button                             id=6 [slave  keyboard (3)]
    ↳ Video Bus                               id=7 [slave  keyboard (3)]
    ↳ Sleep Button                             id=8 [slave  keyboard (3)]
    ↳ AT Translated Set 2 keyboard             id=10 [slave  keyboard (3)]


マウスは ID が 9 になっています。
続いて、マウス(ID=9)に対してカーソルの速度を指定します。数値が大きいほど移動速度は速かったです。

xinput --set-prop 9 "Device Accel Constant Deceleration" 1


2016年5月20日金曜日

Rufus を使って Linux Mint のブート USB 作成

思い立ったが吉日!ということで、余っている EPSON ラップトップに Linux Mint を入れてみることにしました。

まずは Linux Mint のダウンロード。ダウンロードはこちら。
https://www.linuxmint.com/download.php

ダウンロードできた iso ファイルを USB メモリに保存します。続いて Rufus のダウンロード。ダウンロードはこちら。
http://rufus.akeo.ie/

Rufus を実行し、利用する iso ファイルを選択し、スタートボタンをクリックします。

スクリーンショット

2016年4月29日金曜日

Files In Explorer : NetBeans ファイルエクスプローラー

NetBeans のプロジェクトツリーにあるフォルダを、ファイルエクスプローラーで開くことができるようになります。Visual Studio であればデフォルトで使える機能で、便利なのでプラグインで提供されていてよかったです。また少し NetBeans が便利になりました。

Files In Explorer
http://plugins.netbeans.org/plugin/57153/files-in-explorer


2015年11月14日土曜日

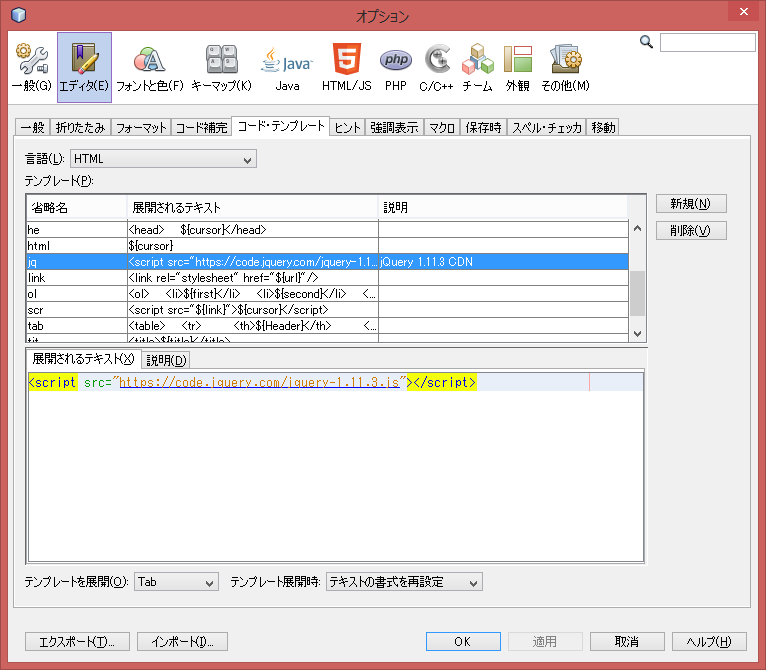
NetBeans でコードスニペットを登録する方法


NetBeans でコードスニペットを登録する方法は以下のとおりです。

1.「ツール」 → 「オプション」を選択


2.「エディタ」タブ → 「コード・テンプレート」 からテンプレートを登録します。
ここでは HTML のスニペットとして「jq」という省略名と、jQuery CDN へのリンクコードを登録しています。


3.2で登録した省略キーを入力し、Tab キーを押下します。


すると、登録されているコードが生成されます。


2015年11月8日日曜日

C# を使った順列

ある数値 n から、順に1ずつ減らした r までを階乗するアルゴリズムです。

namespace ConsoleApplication1
{
    class Program
    {
        static void Main(string[] args)
        {
            int n, r, a, i;

            Console.WriteLine("始めの数値");
            n = int.Parse(Console.ReadLine());

            Console.WriteLine("次の数値");
            r = int.Parse(Console.ReadLine());

            a = 1;

            if (n >= r && r >= 0)
            {
                i = n;
                while (i >= n - r + 1)
                {
                    a = a * i;
                    i = i - 1;
                    Console.WriteLine(a);
                }
            }
            else
            {
                Console.WriteLine("計算できません。");
            }
            Console.ReadLine();
        }
    }
}

2015年11月7日土曜日

NetBeans JavaScript 自動補完

NetBeans を使ってみたところ、JavaScript の IntelliSense がデフォルトで有効になっていました。スクリーンショットは jQuery の IntelliSense です。そう、jQuery も最初から機能の候補をリストアップしてくれて、もう NetBeans に乗り換えようかなと真剣に考える素晴らしさです。